Order of the Sinking StarPuzzle map & solutions

Lobby walkthrough

Starting hubNot on the overworld map6 puzzles10 exhibits

Lobby puzzles

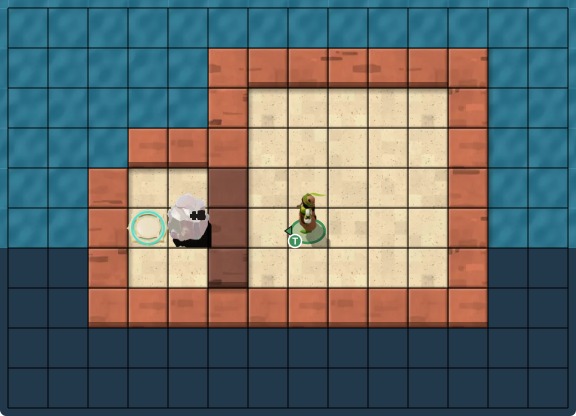
1 Lobby 1: Heroes of Hauling 15, initial design

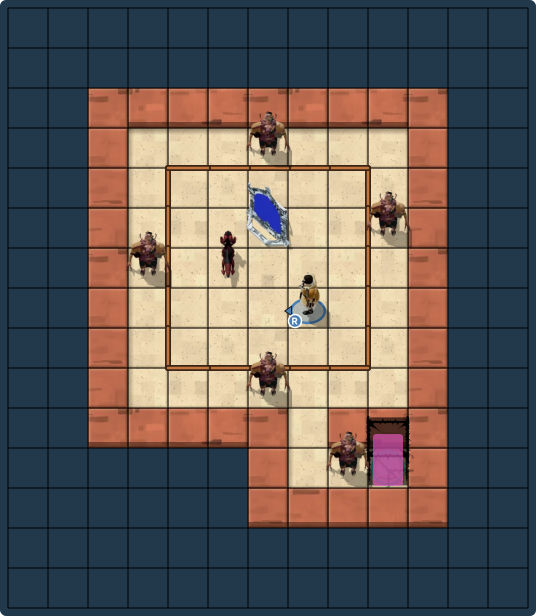
Thief · Gate · Button · CrystalScreen 1 of 3

Layout of Lobby puzzle 1, 13 by 11 tiles
  1. Hint 1

    The Thief can pull the crystal. Something must remain on the button while you leave.

  2. Hint 2

    Getting the crystal onto the button is only half the job. Finish that pull with the Thief on the left of it.

  3. Hint 3

    Pull the crystal up twice and right three times, taking it one tile past the button. Circle around it, then pull it left onto the button.

Full solution33 steps

Verified in the game · build 26249670 · Oct 31, 2026

Pull the crystal onto the button so the Thief ends on its left, then walk through the open gate to the exit.

    1. ThiefInputs 1-7 ↑×2 · ←×2 · ↓ · ↑×2
    1. ThiefInputs 8-12 → · ↓ · →×3
    1. ThiefInputs 13-19 ↓×2 · ←×2 · ↑×2 · ←
    1. ThiefInputs 20-33 ↑ · ← · ↓×3 · →×4 · ↑×4 · ←

Thief: up 2, left 2, down 1, up 2, right 1, down 1, right 3, down 2, left 2, up 2, left 1, up 1, left 1, down 3, right 4, up 4, left 1.

Submit your solution

Record, paste moves, or share a description or video.

Play this puzzle

3 Lobby 3: Heroes and Mirrors 28, initial design

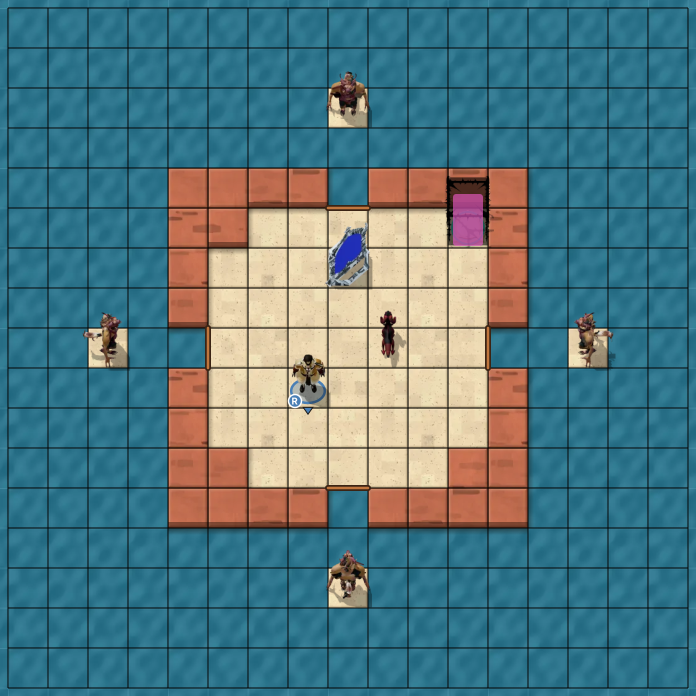
Hero · Mirror · Dragon · Goblin ×5 · GateScreen 2 of 3

Layout of Lobby puzzle 3, 13 by 15 tiles
  1. Hint 1

    Use the dragon to remove the goblins. The magic mirror can reflect the Hero as well as the dragon.

  2. Hint 2

    Move the mirror as you work downward. The final goblin waits beside the exit, so the dragon must reach the bottom of the room.

  3. Hint 3

    With the mirror in its final position, reflect the Hero one tile below it and the dragon two tiles below it. Step left, then push down; both remaining monsters die and the gate opens.

Full solution49 steps

Verified in the game · build 26249670 · Oct 31, 2026

Use reflections to turn the dragon against the goblins, then bring it to the last goblin beside the exit.

    1. HeroInputs 1-11 ← · ↑ · ← · →×2 · ↑ · ← · ↑ · ← · ↓ · activate
    1. HeroInputs 12-16 ← · ↓ · → · ← · activate
    1. HeroInputs 17-19 ← · ↑×2
    1. HeroInputs 20-29 → · ←×2 · ↑×2 · → · ↓ · →×2 · activate
    1. HeroInputs 30-39 ↓ · → · ↓×2 · ←×2 · ↑×2 · → · ↓
    1. HeroInputs 40-44 ← · ↓ · activate · → · activate
    1. HeroInputs 45-46 ← · ↓
    1. HeroInputs 47-49 ↓ · →×2

Hero: left 1, up 1, left 1, right 2, up 1, left 1, up 1, left 1, down 1, activate, left 1, down 1, right 1, left 1, activate, left 1, up 2, right 1, left 2, up 2, right 1, down 1, right 2, activate, down 1, right 1, down 2, left 2, up 2, right 1, down 1, left 1, down 1, activate, right 1, activate, left 1, down 2, right 2.

Submit your solution

Record, paste moves, or share a description or video.

Play this puzzle

4 Lobby 4: Heroes and Mirrors 28, reduced design

Hero · Dragon · Goblin ×4 · Gate · MirrorScreen 2 of 3Opens after Lobby 3

Layout of Lobby puzzle 4, 17 by 17 tiles
  1. Hint 1

    The gate stays closed while monsters remain. Use the dragon against the goblins before getting rid of the dragon.

  2. Hint 2

    Move the mirror to the lower goblin's column and reflect that goblin right across the room. Afterward, line the mirror up beneath the exit.

  3. Hint 3

    Leave the dragon four tiles below the exit. After reflecting the bottom goblin, push the mirror three tiles right. Activate it from one tile below the exit: the dragon lands in the water and the gate opens.

Full solution36 steps

Verified in the game · build 26249670 · Oct 31, 2026

Reposition the dragon with the mirror to clear the goblins, then reflect the dragon into the water to open the exit.

    1. HeroInputs 1-5 →×2 · ↑×2 · activate
    1. HeroInputs 6-8 ↑ · ← · ↓
    1. HeroInputs 9-17 ↑×2 · ← · ↓×2 · ← · ↓×2 · activate
    1. HeroInputs 18-21 →×4
    1. HeroInputs 22-28 ←×4 · ↑ · → · activate
    1. HeroInputs 29-31 →×3
    1. HeroInputs 32-35 ↑ · → · ↑ · activate
    1. HeroInput 36 ↑

Hero: right 2, up 2, activate, up 1, left 1, down 1, up 2, left 1, down 2, left 1, down 2, activate, right 4, left 4, up 1, right 1, activate, right 3, up 1, right 1, up 1, activate, up 1.

Submit your solution

Record, paste moves, or share a description or video.

Play this puzzle

9 Lobby 9: Vertical Endpoints 12, economized design

Screen 2 of 3

Pieces

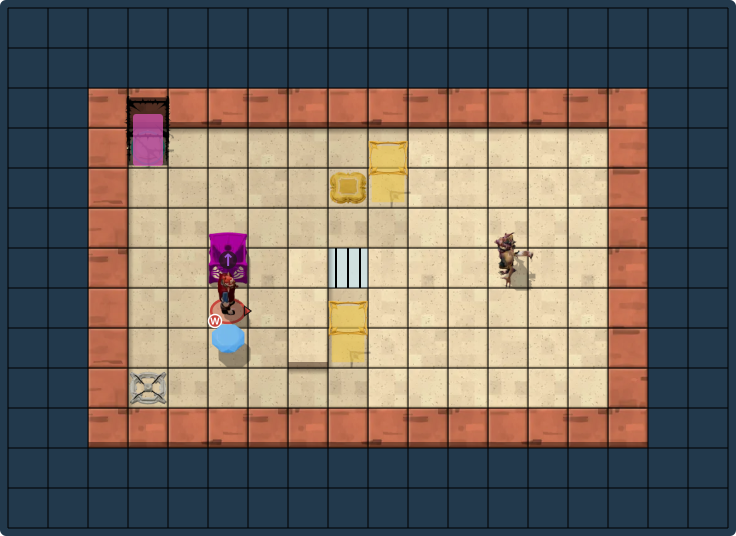
Warrior · Gem pad · Button · Goblin · Gate ×3 · Gem · Beam source

Layout of Lobby puzzle 9, 18 by 13 tiles
  1. Hint 1

    The upward beam can carry the goblin when you move the source underneath it.

  2. Hint 2

    Push the gem around the upper level to drive the goblin left, onto the upward beam. Return the gem to its socket after moving the goblin to the gate beside the button.

  3. Hint 3

    Leave the beam source on the gate immediately right of the button. Put the gem in the lower-left socket, then step onto the button and off to the left; the exit gate opens.

Full solution200 steps

Verified in the game · build 26249670 · Nov 1, 2026

Move the goblin with the upward beam and use the button-controlled gate to clear the exit.

    1. WarriorInputs 1-25 → · ↓ · ← · ↑ · ←×2 · ↓×2 · → · ↑×3 · ← · ↑ · →×4 · ↑ · → · ↓ · ←×2 · ↓ · ←
    1. WarriorInputs 26-39 ↑ · ←×2 · ↓×2 · → · ↑×2 · ← · ↑ · →×4
    1. WarriorInputs 40-43 ↓ · → · ↓×2
    1. WarriorInputs 44-56 ↑×2 · ←×4 · ↑×2 · →×4 · ↓
    1. WarriorInputs 57-73 →×2 · ↓×2 · ←×3 · ↓×2 · →×2 · ↓ · → · ↑×4
    1. WarriorInputs 74-77 ←×2 · ↑ · →
    1. WarriorInputs 78-84 →×3 · ↑ · → · ↓×2
    1. WarriorInputs 85-91 → · ↓ · ←×5
    1. WarriorInputs 92-98 ↑ · ←×2 · ↑ · ← · ↓ · ←
    1. WarriorInputs 99-112 ←×2 · ↑ · →×7 · ↓×2 · ←×2
    1. WarriorInputs 113-116 ↑ · ←×2 · ↓
    1. WarriorInputs 117-134 ←×3 · ↑×2 · →×7 · ↓×2 · ←×3 · ↑
    1. WarriorInputs 135-156 ←×2 · ↓×3 · → · ↑×2 · ←×3 · ↑×2 · → · ↑ · →×3 · ↓×2 · ←×2
    1. WarriorInputs 157-160 ↑×2 · → · ↓
    1. WarriorInputs 161-173 ←×3 · ↓×2 · → · ↑ · ← · ↑ · →×4
    1. WarriorInput 174 →
    1. WarriorInputs 175-185 ← · ↓ · ←×3 · ↑ · ← · ↓×4
    1. WarriorInputs 186-195 ↑×4 · →×5 · ←
    1. WarriorInputs 196-200 ←×4 · ↑

Warrior: right 1, down 1, left 1, up 1, left 2, down 2, right 1, up 3, left 1, up 1, right 4, up 1, right 1, down 1, left 2, down 1, left 1, up 1, left 2, down 2, right 1, up 2, left 1, up 1, right 4, down 1, right 1, down 2, up 2, left 4, up 2, right 4, down 1, right 2, down 2, left 3, down 2, right 2, down 1, right 1, up 4, left 2, up 1, right 4, up 1, right 1, down 2, right 1, down 1, left 5, up 1, left 2, up 1, left 1, down 1, left 3, up 1, right 7, down 2, left 2, up 1, left 2, down 1, left 3, up 2, right 7, down 2, left 3, up 1, left 2, down 3, right 1, up 2, left 3, up 2, right 1, up 1, right 3, down 2, left 2, up 2, right 1, down 1, left 3, down 2, right 1, up 1, left 1, up 1, right 5, left 1, down 1, left 3, up 1, left 1, down 4, up 4, right 5, left 5, up 1.

Submit your solution

Record, paste moves, or share a description or video.

Play this puzzle

10 Lobby 10: Reflected Beams 13, initial design

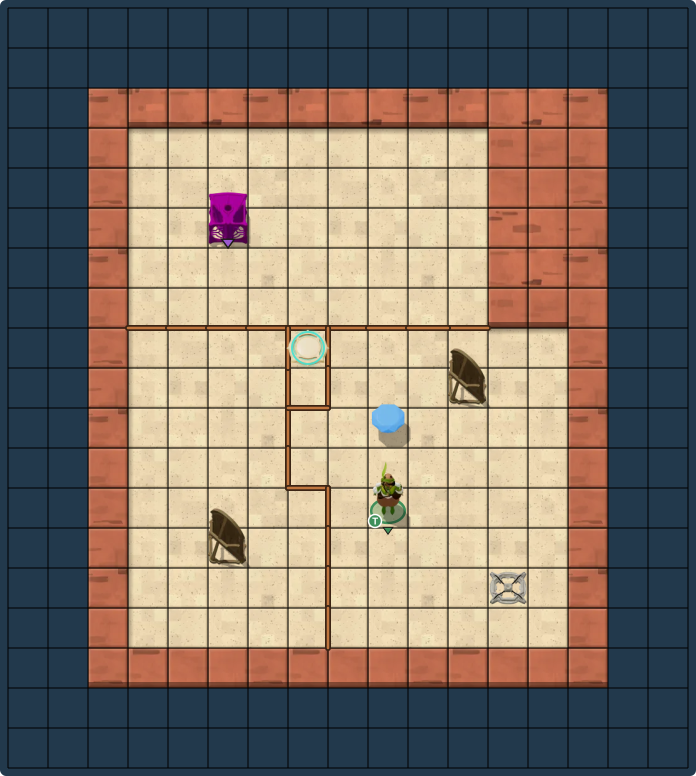
Thief · Gem pad · Mirror ×2 · Gem · Beam sourceScreen 2 of 3

Layout of Lobby puzzle 10, 17 by 19 tiles
  1. Hint 1

    Pull the gem four tiles down and three tiles right onto the lower-right socket before moving the right mirror.

  2. Hint 2

    Use the bottom passage to reposition the right mirror. Pull the bottom-left mirror one tile down before taking it around the left fence.

  3. Hint 3

    Finish with the left mirror one tile left and four tiles above its start, the right mirror three tiles left of its start, and the beam source one tile left of its start. Return the gem to its socket after raising the right mirror.

Full solution196 steps · shortest

Verified in the game · build 26249670 · Nov 1, 2026

Use the Thief to move the mirrors around the fences, then restore the gem and align the beam source.

    1. ThiefInputs 1-10 ↑ · ↓×4 · → · ↑ · →×3
    1. ThiefInputs 11-24 ↑×2 · ←×2 · ↑×2 · ↓×5 · ← · ↑ · ←
    1. ThiefInputs 25-33 ↑ · ← · → · ↑ · →×5
    1. ThiefInputs 34-50 ↓ · ← · ↓ · ↑ · ←×2 · ↓ · ← · ↑ · → · ↑×4 · ← · ↓ · ←
    1. ThiefInputs 51-55 ↓ · → · ↓×3
    1. ThiefInputs 56-65 →×2 · ↑ · ← · ↑ · ←×5
    1. ThiefInputs 66-72 ↓ · → · ↓×2 · ←×2 · ↓
    1. ThiefInputs 73-80 → · ↑ · → · ↑ · ←×2 · →×2
    1. ThiefInputs 81-85 ↓×2 · ← · ↑ · ↓
    1. ThiefInputs 86-95 ← · ↑ · ← · → · ↑ · →×5
    1. ThiefInputs 96-112 ↓ · ← · ↓ · ↑ · ←×2 · ↓ · ← · ↑ · → · ↑×4 · ← · ↓ · ←
    1. ThiefInputs 113-118 ↓ · → · ↓×4
    1. ThiefInputs 119-128 →×2 · ↑ · ← · ↑ · ←×5
    1. ThiefInputs 129-144 ↓ · → · ↓ · ↑ · ←×3 · ↓ · ← · ↑ · → · ↑×5
    1. ThiefInputs 145-151 → · ↑ · → · ↑ · →×3
    1. ThiefInputs 152-157 ↓ · ← · ↓ · ↑ · → · ↑
    1. ThiefInputs 158-167 ←×4 · ↓ · ↑×5
    1. ThiefInputs 168-178 → · ↓×4 · → · ↓ · → · ↓ · → · ↓
    1. ThiefInputs 179-192 ← · ↑×6 · ←×2 · ↑ · ←×4
    1. ThiefInputs 193-196 ↓ · → · ↓ · ↑

Thief: up 1, down 4, right 1, up 1, right 3, up 2, left 2, up 2, down 5, left 1, up 1, left 1, up 1, left 1, right 1, up 1, right 5, down 1, left 1, down 1, up 1, left 2, down 1, left 1, up 1, right 1, up 4, left 1, down 1, left 1, down 1, right 1, down 3, right 2, up 1, left 1, up 1, left 5, down 1, right 1, down 2, left 2, down 1, right 1, up 1, right 1, up 1, left 2, right 2, down 2, left 1, up 1, down 1, left 1, up 1, left 1, right 1, up 1, right 5, down 1, left 1, down 1, up 1, left 2, down 1, left 1, up 1, right 1, up 4, left 1, down 1, left 1, down 1, right 1, down 4, right 2, up 1, left 1, up 1, left 5, down 1, right 1, down 1, up 1, left 3, down 1, left 1, up 1, right 1, up 5, right 1, up 1, right 1, up 1, right 3, down 1, left 1, down 1, up 1, right 1, up 1, left 4, down 1, up 5, right 1, down 4, right 1, down 1, right 1, down 1, right 1, down 1, left 1, up 6, left 2, up 1, left 4, down 1, right 1, down 1, up 1.

Other routes1
  1. Route 2258 steps

    Verified in the game · build 26249670 · Nov 1, 2026

    Use the Thief to fill the gem socket and reposition the two mirrors around the fences.

      1. ThiefInputs 1-24 ↑ · ↓×4 · ← · ↑×2 · →×2 · ↓ · →×3 · ↑×2 · ←×5 · ↑×3
      1. ThiefInputs 25-34 →×2 · ← · ↓ · → · ↓×5
      1. ThiefInputs 35-46 ←×2 · ↑×2 · ← · → · ↑ · →×5
      1. ThiefInputs 47-64 ↓×2 · ← · ↓ · ↑ · ←×2 · ↓ · ← · ↑ · → · ↑×4 · ← · ↓ · ←
      1. ThiefInputs 65-69 ↓ · → · ↓×3
      1. ThiefInputs 70-87 → · ↑×3 · ← · ↑×3 · →×2 · ↑ · ← · ↑ · ←×5
      1. ThiefInputs 88-95 ↓×2 · → · ↓×2 · ←×2 · ↓
      1. ThiefInputs 96-108 → · ↑ · → · ↑ · ←×2 · ↑ · ← · ↑ · → · ↓ · →×2
      1. ThiefInputs 109-127 ↑ · ←×2 · ↓×2 · → · ↓×2 · ←×2 · ↑ · ← · → · ↑ · →×5
      1. ThiefInputs 128-145 ↓×2 · ← · ↓ · ↑ · ←×2 · ↓ · ← · ↑ · → · ↑×4 · ← · ↓ · ←
      1. ThiefInputs 146-151 ↓ · → · ↓×4
      1. ThiefInputs 152-170 → · ↑×3 · ← · ↑×4 · →×2 · ↑ · ← · ↑ · ←×5
      1. ThiefInputs 171-187 ↓×2 · → · ↓ · ↑ · ←×3 · ↓ · ← · ↑ · → · ↑×5
      1. ThiefInputs 188-201 → · ↑ · → · ↑ · →×3 · ↓×2 · ← · ↓ · ↑ · → · ↑
      1. ThiefInputs 202-209 ←×3 · ↓×2 · →×3
      1. ThiefInputs 210-214 ↓ · ←×2 · ↑ · ←
      1. ThiefInputs 215-221 ↑ · ← · ↑ · → · ↑ · →×2
      1. ThiefInputs 222-238 ↓×2 · ← · ↓ · ↑ · ←×2 · ↓ · ← · ↑ · → · ↑×3 · ← · ↓ · ←
      1. ThiefInputs 239-242 ↑ · → · ↑×2
      1. ThiefInputs 243-258 →×2 · ↑ · ← · ↑ · ←×6 · ↓×2 · → · ↓ · ↑

    Thief: up 1, down 4, left 1, up 2, right 2, down 1, right 3, up 2, left 5, up 3, right 2, left 1, down 1, right 1, down 5, left 2, up 2, left 1, right 1, up 1, right 5, down 2, left 1, down 1, up 1, left 2, down 1, left 1, up 1, right 1, up 4, left 1, down 1, left 1, down 1, right 1, down 3, right 1, up 3, left 1, up 3, right 2, up 1, left 1, up 1, left 5, down 2, right 1, down 2, left 2, down 1, right 1, up 1, right 1, up 1, left 2, up 1, left 1, up 1, right 1, down 1, right 2, up 1, left 2, down 2, right 1, down 2, left 2, up 1, left 1, right 1, up 1, right 5, down 2, left 1, down 1, up 1, left 2, down 1, left 1, up 1, right 1, up 4, left 1, down 1, left 1, down 1, right 1, down 4, right 1, up 3, left 1, up 4, right 2, up 1, left 1, up 1, left 5, down 2, right 1, down 1, up 1, left 3, down 1, left 1, up 1, right 1, up 5, right 1, up 1, right 1, up 1, right 3, down 2, left 1, down 1, up 1, right 1, up 1, left 3, down 2, right 3, down 1, left 2, up 1, left 1, up 1, left 1, up 1, right 1, up 1, right 2, down 2, left 1, down 1, up 1, left 2, down 1, left 1, up 1, right 1, up 3, left 1, down 1, left 1, up 1, right 1, up 2, right 2, up 1, left 1, up 1, left 6, down 2, right 1, down 1, up 1.

Submit your solution

Record, paste moves, or share a description or video.

Play this puzzle

15 Lobby 15: Difficult and Unrewarding, left door

Hard

Thief · Crystal ×8Screen 3 of 3

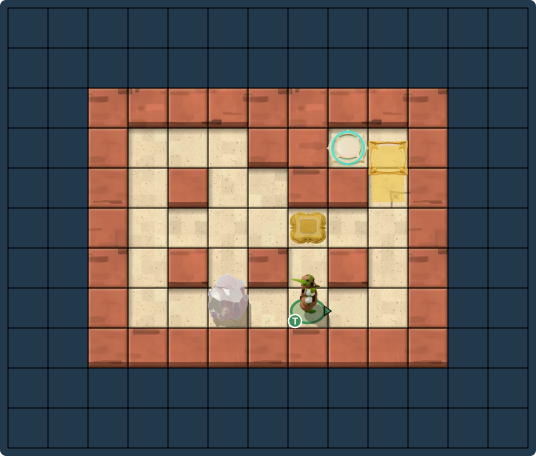
Layout of Lobby puzzle 15, 14 by 7 tiles
  1. Hint 1

    Pull the lowest crystal out of the stack; the crystals above it drop into reach.

  2. Hint 2

    You need the space to the right and above the stack. Park extracted crystals there instead of blocking the approach to the next one.

  3. Hint 3

    After taking out the last crystal, work around to its left, then pull it left three times. The Thief reaches the exit and the crystal stays behind.

Full solution116 steps

Verified in the game · build 26249670 · Oct 31, 2026

Pull all eight crystals out of the stack, using the space to its right to keep the exit approach clear.

    1. ThiefInputs 1-8 ←×2 · →×2 · ↑ · ← · ↑×2
    1. ThiefInputs 9-21 → · ↓×3 · ←×2 · →×3 · ↑ · ← · ↑ · →
    1. ThiefInputs 22-34 ↓×2 · ←×3 · →×4 · ↑ · ← · ↑×2
    1. ThiefInputs 35-45 ←×2 · ↓×3 · ← · →×5
    1. ThiefInputs 46-51 ↑ · ←×2 · → · ↑ · →
    1. ThiefInputs 52-68 ↓×2 · ←×5 · →×5 · ↓ · ←×2 · ↑ · ←
    1. ThiefInputs 69-84 ↓ · ← · ↑ · ← · →×2 · ↑ · ← · ↑×2 · →×2 · ↓×2 · ↑×2
    1. ThiefInputs 85-99 →×2 · ↓×3 · ←×5 · →×5
    1. ThiefInputs 100-109 ↓ · ←×3 · ↑ · ←×2 · →×3
    1. ThiefInputs 110-116 ↓ · ←×2 · ↑ · ←×3

Thief: left 2, right 2, up 1, left 1, up 2, right 1, down 3, left 2, right 3, up 1, left 1, up 1, right 1, down 2, left 3, right 4, up 1, left 1, up 2, left 2, down 3, left 1, right 5, up 1, left 2, right 1, up 1, right 1, down 2, left 5, right 5, down 1, left 2, up 1, left 1, down 1, left 1, up 1, left 1, right 2, up 1, left 1, up 2, right 2, down 2, up 2, right 2, down 3, left 5, right 5, down 1, left 3, up 1, left 2, right 3, down 1, left 2, up 1, left 3.

Submit your solution

Record, paste moves, or share a description or video.

Play this puzzle

Exhibits

Puzzles behind the Lobby exhibit doors. Each is the final version of an overworld puzzle.

By (Editor, WikiTactics) Edition published

Search Order of the Sinking Star

    Heroes (north)Mirror Isles (east)Skipping Stones (south)Beamcasters (west)Puzzle mapOverworld routesRules and itemsGold roomsSecrets and treasuresEndingsAchievementsThreads and activityPlayer guidesMy contributions

    Record